Wednesday 29 December 2010

Molding -casting process step by step.

Ok, here's how i go about molding one of my busts in silicone in order to get a resin cast of it.
                                                                    
                                                                        MOLDING.

1: the finished WED sculpt covered with clear acrylic spray for easyer and cleaner release from the silicone.
 2: The first layer of silicone(100ml) ( RTV silicone rubber for molds). I used a soft brush to apply it and blowed air to it with the airbrush to eliminate any airbubbles. Also added a small piece of elastic cloth mesh to the forehead so that the silicone wouldn't tear while trying to get the cast out.
 3: Second layer 100ml and another piece of mesh. I colored the second layer so that i have control of the thickness of the silicone.
 3: Third and fourth layer(200ml each).Just to give the mold more thickness and durability. i used thixotropic agent to make the silicone paste like and applyed it with a spatoula.
 4:Front half piece of plaster for support (mother mold). I then added vaseline to the edge and applyed the back half. When it was dry i separated the 2 plaster pieces  started cutting the silicone to remove the clay sculpt from inside.


5: Here you can see how and where the silicone was cut. (The sculpt was removed here).

6: Another view of the closed mold.

CASTING.
1:Filling the bucket with 850ml of translucent poyester resin.It's called MPAL and that's it's original color before i add white oil color and catalyst to it.
2: I add that amount of white oil color in the resin. The oppacity or translucency of the cast depends on the ammount of color in the mix. I found out that this is a good ratio.
3:Mixing the color good  first and then adding the catalyst. (10-12g per kg).
4: After the catalyst is mixed very well i hold the mold in that position and start pouring very small ammounts on the face area while guiding the resin with the back of a small brush so that i'm sure that there aren't any major airbubbles traped inside. Especially the ears and facial features.
 5:Then i close the mold carefully and start pouring larger ammounts while rotating the mold with my other hand. I ususally see the bubbles coming up to the surface when i'm doing that and it feels good! :)
 The filed mold waiting to set.
 I also fill these molds with the same batch of resin for the bases.
 Here's the resin's color after about 2 hours from casting. It's now ready to come out of the mold.
And this is the raw cast right out of the mold and mounted on it's base. First i pull the ears off carefully and the rest of it comes out with no effort.I needed both my hands for that so there are no pics:) 
Next time i'll post the process of the painting on a piece like that.

Tuesday 21 December 2010

Albino version .

This is the second cast that i painted. I was going for the albino look and i like this version better. Very quick paintjob too! Half the time i spent on the first one:)

Saturday 18 December 2010

Finished bat creature bust.

Ok, here's the finished piece. I changed the color of the eyes for some contrast.And added some freckles and veins.


Friday 17 December 2010

Bat creature almost finished.

I started painting that 1st resin cast of the bust today.
I decided to stop here before i get carried away with it and overdo it with the painting.Needs some gloss on the eyes and maybe some very subtle veining.I'll post the finished bust tomorrow.

Bat creature bust raw cast.

I molded the bust and  cast the 1st resin copy of it. I'm pretty happy with the result :) Now i'm off to go and paint it! yay!


Wednesday 15 December 2010

Update.

I added color in Zbrush and finished it in Photoshop.
Here are 2 different versions.


Tuesday 14 December 2010

Digital concept for a practical sculpt.

Every once in a while i like using Zbrush for coming up with concepts and ideas for future practical sculpts.
Since i can't draw that well, it's a very usefull tool for me to visualize an idea .
Here's what i came up with after about 2 hours of "working" time yesterday. Still need to get a wacom tablet!

Thursday 9 December 2010

Bat creature bust in proggress.

Here's a new 6 inches tall bust i'm working on. It's made out of WED clay and i'll cast it in resin.

This is before i made the ears bigger.
 Updated.


Saturday 4 December 2010

More 2010 personal work.

                                               Here is some more work from 2010.


Tuesday 30 November 2010

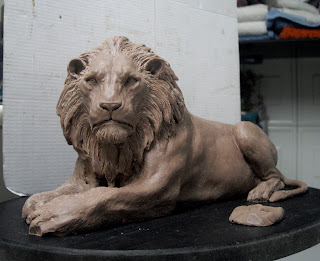
Some proggress on the lion sculpt.

I worked some more on the lion sculpt. Here are some pics with the updated piece.

Slightly updated head.

 The roughed out body.

 Still need to work on the mane. It'll be a chalenge for me to sculpt hair!
More updates coming soon ;)

Sunday 21 November 2010

Lion sculpt.

I decided to go away from the fantasy element in my latest WIP sculpt.:) And i enjoy it very much!
Always thought that lions and big cats generally are probably the most gracious and beautifull animals IMO on the planet. And that's what i want to capture in this sculpt.
I'm planning on making  it a full body sculpt and probably lying down for easyer molding as well.
The head is about 5 inches tall and i used "Monster clay" from Monster makers.com.

Updates are coming soon ;)


Friday 19 November 2010

Sculpting demo #1.

Here's a video timelapse of 1 hour sculpt compressed in 3 minutes.
I used WED clay and didn't have anything specific in mind in terms of design. Just followed my gut and kept changing it till the battery of the camera dyied!I call this kind of sculpting 'immprovisation" or "freestyle".
 The next one will be a design i 've thought of  before i start sculpting or even skeched on clay, paper or zbrush.
Hope you enjoy :)
The soundtrack is "Plasma" Electrovision album from Doug Aldrich.


Tuesday 16 November 2010

Update.

Here's a small update on the busts.
I started adding finer details and refining the sculpts.